Integrating WaPOR and GEE for IGwA
3. Chapter 2: Setting Up GEE Pipelines and Downloading WaPOR Data
This chapter provides a comprehensive guide to setting up Google Earth Engine (GEE) with a Google Cloud Project and integrating WaPOR L1 and 3 data processing pipelines. The primary goal is to establish a robust geospatial infrastructure that supports workflows for groundwater modelling assessment. By following the outlined steps, you will prepare the technical foundation for accessing, processing, and integrating high-resolution geospatial datasets from FAO's WaPOR platform into GEE.
The chapter is divided into three main sections:
-
Setting Up GEE with Google Cloud Project: This section details the prerequisites and step-by-step instructions for configuring your GEE environment, including account setup, API activation, and service account creation. It also covers initializing Earth Engine in Google Colab to facilitate programmatic data processing.
-
Adding Shapefiles as GeoJSON for Earth Engine: This section explains how to convert shapefiles into GeoJSON format and upload them to GEE as assets. This foundational step is crucial for defining areas of interest, clipping data, and supporting workflows such as groundwater analysis and dashboard development.
-
Accessing and Downloading WaPOR L3 Data: This section explores two methods for accessing and preparing WaPOR data—the manual approach using the wapordl package and the fully automated WaPOR v3 Geospatial Data Pipeline. Each method is described in detail, with a comparison to help you choose the best approach for your project.
Objectives
By the end of this chapter, you will:
-
Set up a functional GEE environment tailored to your project needs.
-
Configure authentication for accessing, clipping, and exporting multi-temporal WaPOR raster imagery.
-
Learn how to download and preprocess WaPOR L1 and 3 data using both manual and automated methods.
-
Convert shapefiles to GeoJSON and upload them as GEE assets for further geospatial analysis.
-
Gain insights into workflows that support efficient geospatial analysis for groundwater recharge and usage modeling.
Overview of the Process
The setup process addresses key technical challenges, including:
-
Accessing FAO WaPOR datasets for high-resolution geospatial analysis.
-
Managing multi-temporal raster imagery with consistent spatial resolutions and UTM zone-specific projections.
-
Preparing shapefiles as GeoJSON assets to enable advanced operations in GEE.
-
Automating or streamlining the extraction, preprocessing, and uploading of geospatial data to Earth Engine.
2.1 Setting Up GEE with Google Cloud Project
Prerequisites
- A Google Account
Step-by-Step Guide

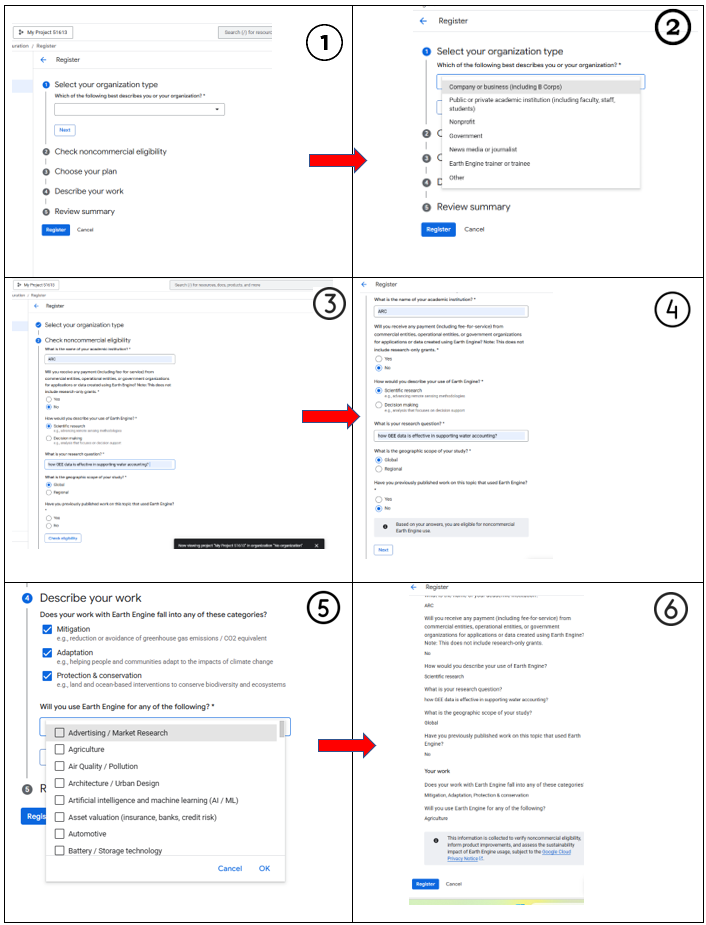
Step 1: Sign Up for Google Earth Engine ✍️
- Navigate to the Sign-Up Page: Go to the official Google Earth Engine website for noncommercial and research use: Google Earth Engine Sign-Up Page
- Select "noncommercial".
- Get Started: Click the "Get Started" button. You may be prompted to sign in with the Google account you wish to use.
** You will be redirected to the Google Cloud Console. Here, you'll link GEE to a Cloud project**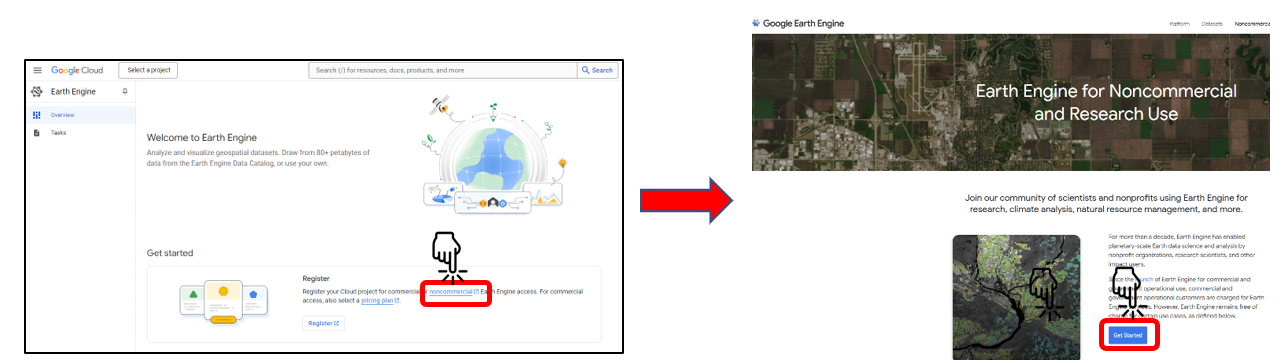
Step 2: Create and Select a Google Cloud Project ☁️
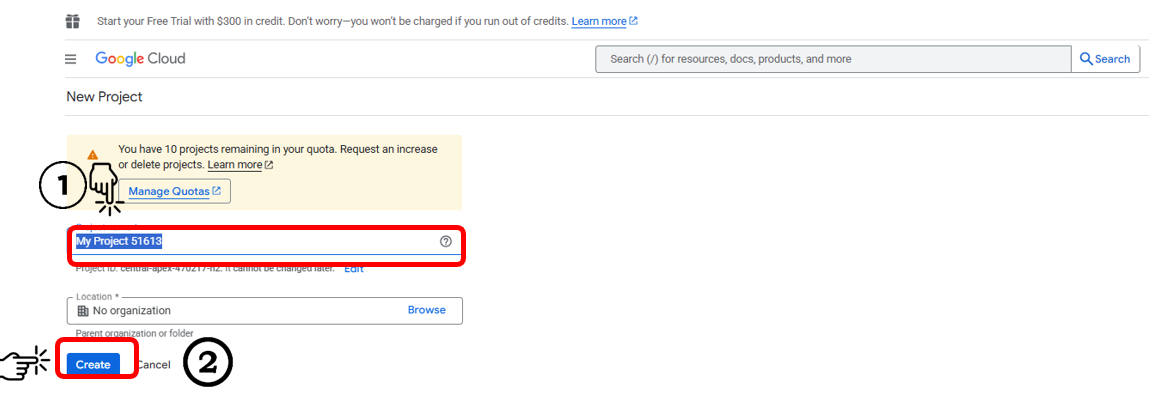
- Create a New Project: In the project selection dialog, click " New project"
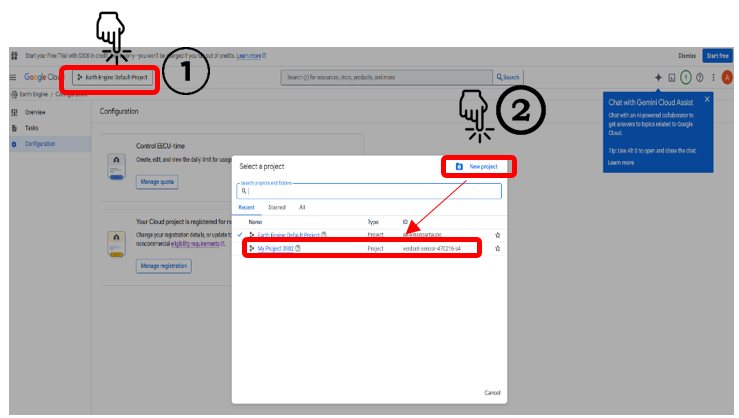
2. Enter Project Details:
-
-
Provide a unique
Project name (e.g.,
my-gee-project). -
If you're using a personal account, select
"No Organization".
-
Finalize Creation: Click "Create".
-
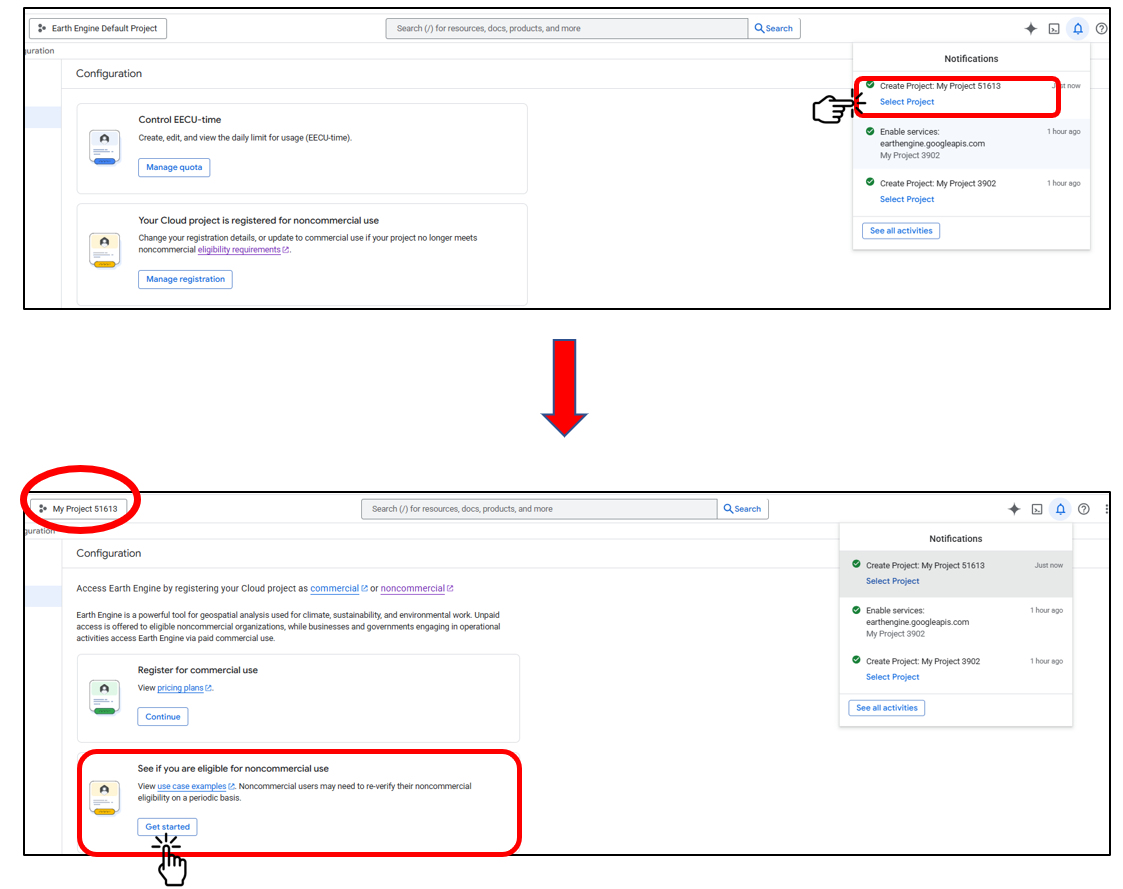
Step 3: Complete Noncommercial Registration Form 📝
1- Select Your Project
-
-
After clicking “Create” in the previous step, your project will appear in the Notifications menu.
-
Click on the project to open it.
-
Confirm that the project name is displayed in the Project Selection dialog at the top-right corner of the page.
-
2- Choose Your Plan
-
-
Review the eligibility criteria to ensure you qualify for the noncommercial plan.
-
Once confirmed, click “Get Started.”
-
3- Describe Your Work: Fill out the questionnaire detailing how you plan to use Earth Engine for your projects.
4- Review and Submit: Review the summary of your application and submit it.
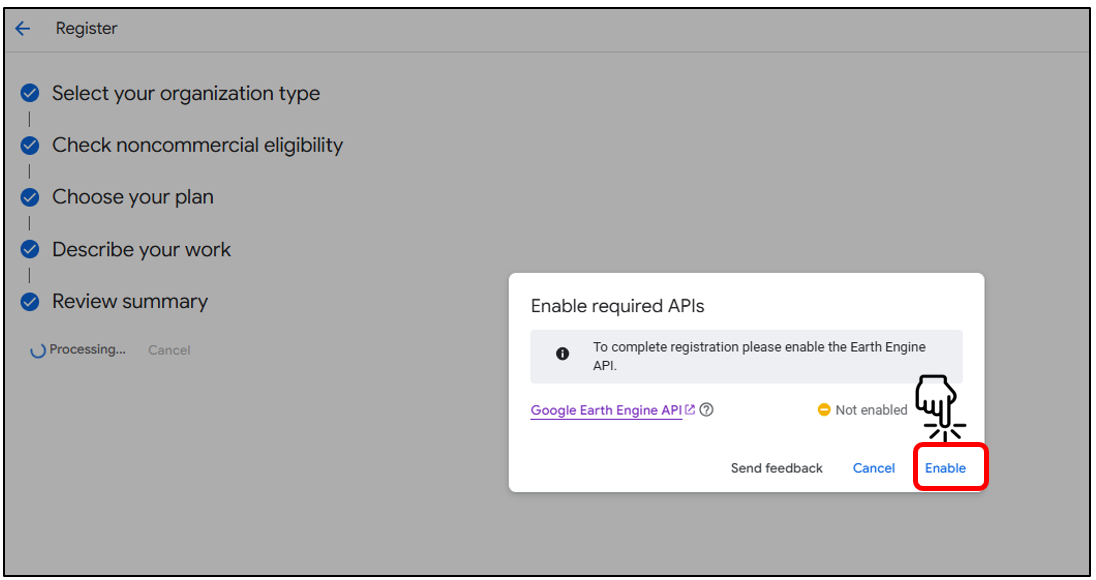
Step 4: Enable the Earth Engine API 🔌
To allow your project to communicate with GEE, you must enable the API.
-
Access the API: During the registration process, a dialog box will appear titled "Enable required APIs".
-
Enable the API: Ensure your new project is selected and click "Enable". Activation may take a few moments.
Step 5: Set Up the GEE Code Editor 🗂️
- Confirmation: Once enabled, you'll see a confirmation message that you are registered for noncommercial use. "Click Continue"
- Connect to Code Editor: Click on the "Code editor" icon (see second image), you will be redirected to the Earth Engine Code Editor page.
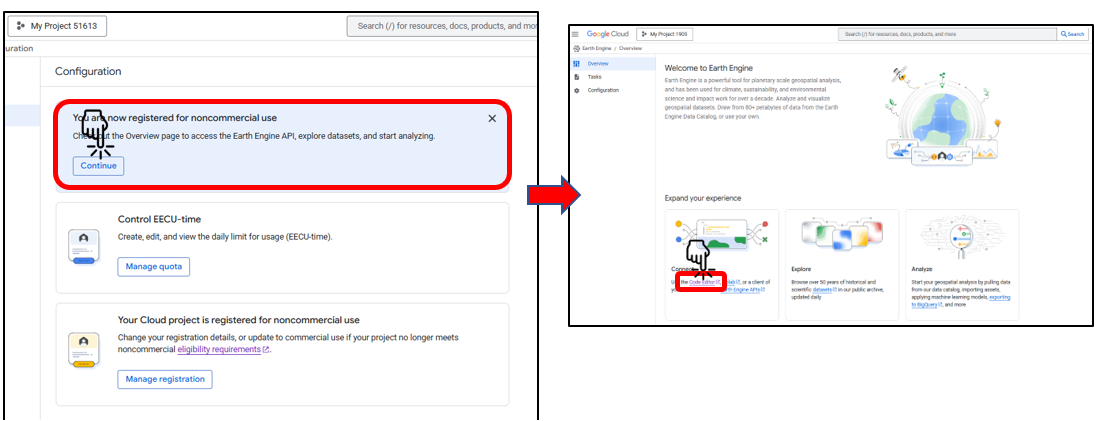
Step 6: Select a Cloud Project
-
Click the Project Selection Menu located in the top-right corner of the Earth Engine interface (highlighted in the first image).
-
From the dropdown menu, select “Change Cloud Project” or choose an existing project.
-
In the Choose a Cloud Project dialog (shown in the second image), click the Project dropdown and pick the project you want to associate with your Earth Engine workspace.

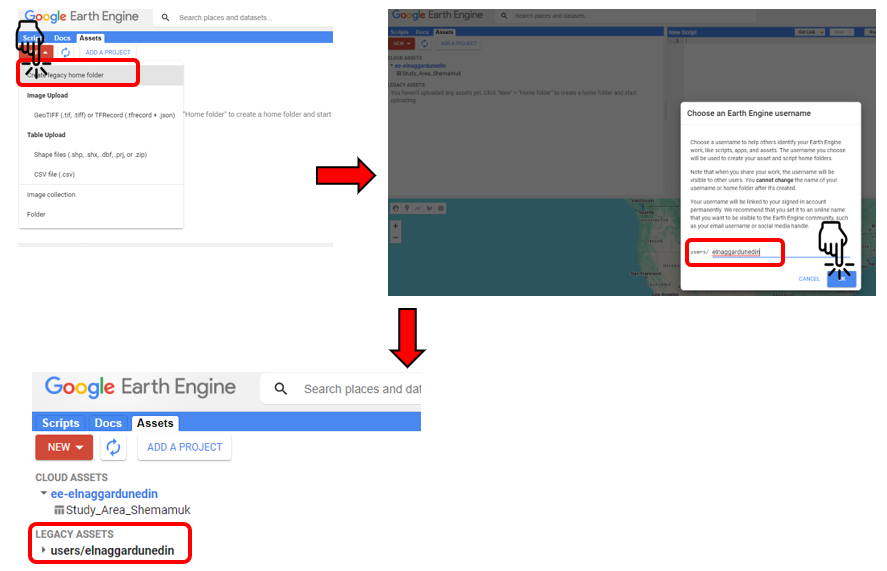
Step 7: Create a Legacy Asset
Legacy assets in Google Earth Engine serve as storage for processed images, which can later be utilized for tasks such as groundwater modeling.
-
Open the Assets Tab:
- Navigate to the Google Earth Engine interface and click on the Assets tab at the top of the page.
-
Initiate Legacy Asset Creation:
- Click the New button in the Assets tab.
- From the dropdown menu, select Create Legacy Home Folder to begin setting up your asset storage.
-
Set a Username for the Asset Folder:
- A dialog box will appear prompting you to choose an Earth Engine username.
- Enter your desired username (e.g., elnaggardunedin) and click OK.
-
Verify Legacy Asset Creation:
- Once created, the legacy asset folder will appear under the Legacy Assets section of the Assets tab (e.g.,
users/elnaggardunedin). - This folder will serve as a storage location for processed images generated during tasks like groundwater modeling.
- Once created, the legacy asset folder will appear under the Legacy Assets section of the Assets tab (e.g.,
Notes:
- The legacy asset folder is essential for managing and organizing outputs from your Earth Engine workflows, especially when dealing with large datasets or multiple processing steps.
- Ensure that the username you choose is appropriate and reflects your work, as it cannot be changed later.
- For effective storage management, consider organizing images into subfolders or collections based on project stages (e.g., preprocessing, modeling, and results).
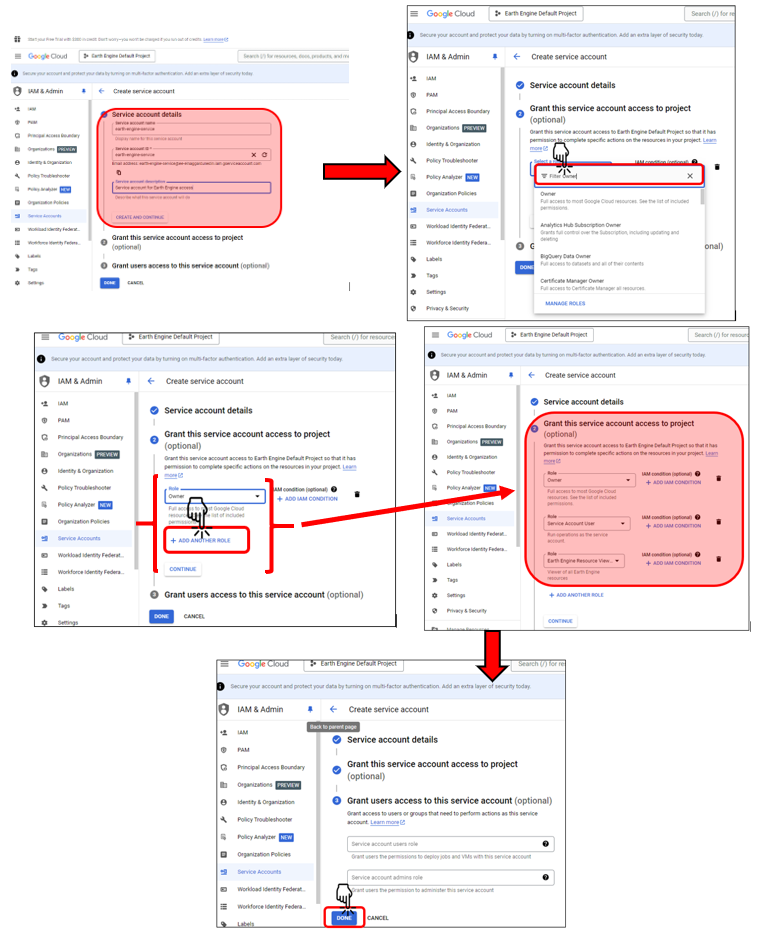
Step 8: Create and Configure a Service Account
- Open Service Accounts Section:
o In the Google Cloud Console, (https://console.cloud.google.com/) navigate to "IAM & Admin" > "Service Accounts."
- Create a New Service Account:
o Click "Create Service Account."
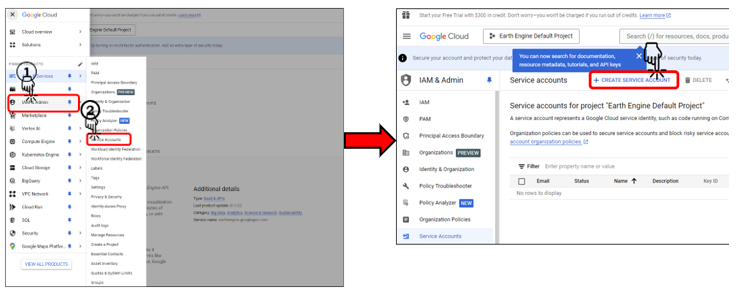
o Provide a name (e.g., "earth-engine-service") and description.
o Click "Create and Continue."
- Assign Required Roles:
o Add the following roles:
- "Owner"
- "Service Account User"
- "Earth Engine Resource Viewer"
o Click "Continue" and then "Done."
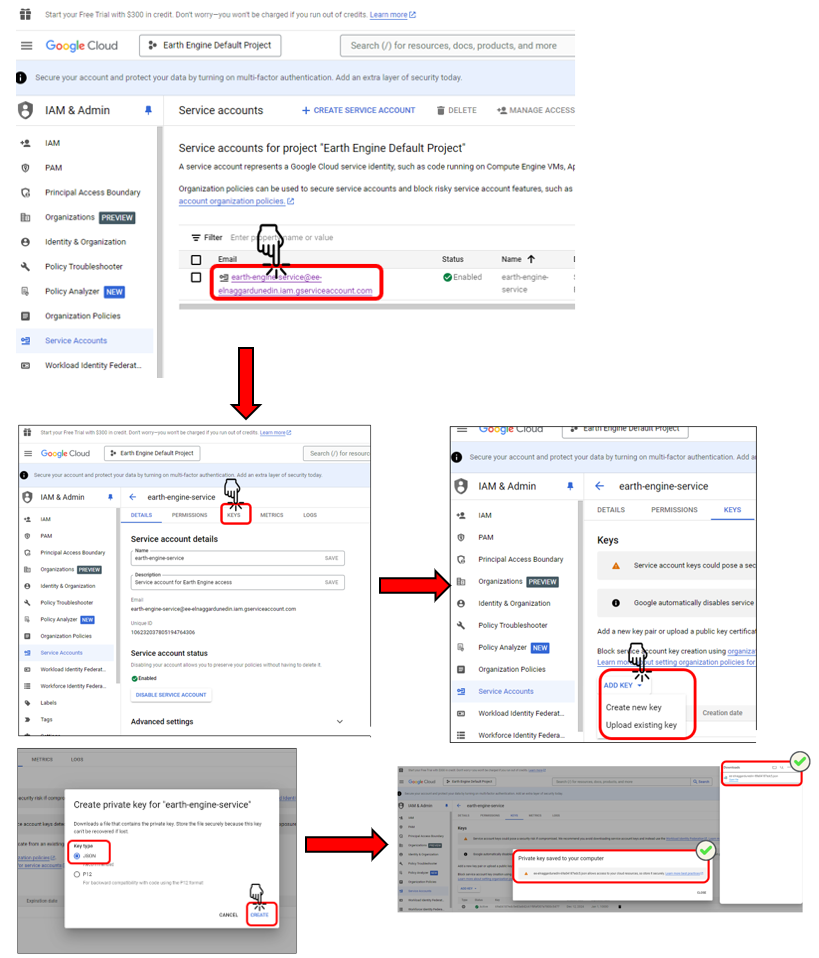
- Generate a JSON Key:
o Click on your new service account from the list.
o Go to the "Keys" tab and click "Add Key" > "Create New Key."
o Choose "JSON" format and download the key file on your local PC.
o Save the JSON file to a known and secure location on your local PC.
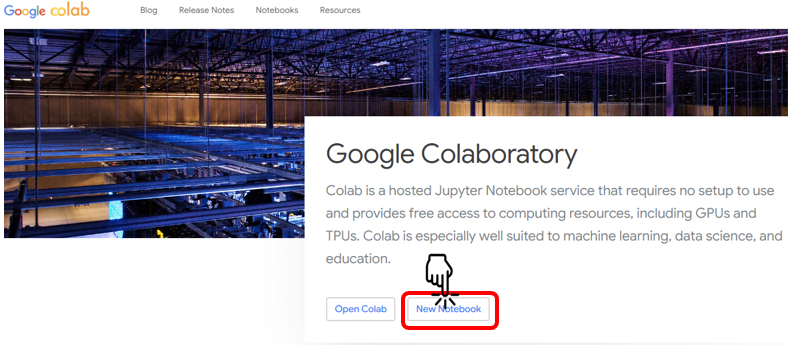
Step 9: Set Up Google Colab
-
Open a New Colab Notebook: Visit Google Colab and create a new notebook.
- Install Required Packages: Run the following commands in a code cell to install the necessary libraries:
!pip install earthengine-api
!pip install geemap
Step 10: Initialize Earth Engine in Colab
-
Import and Authenticate: Import the Earth Engine library and authenticate your Google account.
- Run the following code in a new cell:import ee # Authenticate Earth Engine access ee.Authenticate()- This will open a browser window prompting you to sign in and grant access permissions.
-
Initialize the Library:
Initialize Earth Engine with your project ID. Replaceyour-project-idwith the actual project ID. For example:# Replace with your project ID ee.Initialize(project='your-project-id') # Example: ee.Initialize(project='centering-sweep-439715-b3') # Verify the connection print('Earth Engine package initialized')````````````````````````````````````# Install required packages
!pip install earthengine-api
!pip install geemap````````````````````````````````# Import Earth Engine and authenticate
import ee
ee.Authenticate()``````````````````````````````````````````
# Initialize Earth Engine with your project ID
ee.Initialize(project='ee-enlaggardnudein)# Verify the connection
print('Earth Engine package initialized.')``````````````````````````````````````````````````````````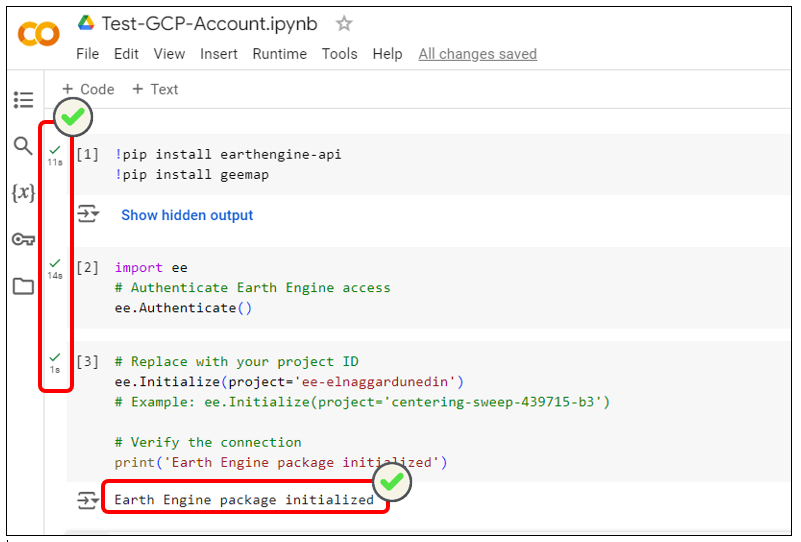
Step 11: Test Your Setup
- Run a Test Script:
Verify the setup by retrieving a satellite image and printing its metadata:# Retrieve a sample satellite image image = ee.Image('USGS/SRTMGL1_003') # Print image information print('Image information:', image.getInfo())``````````````````# Load a sample satellite image from Earth Engine
image = ee.Image("USGS/SRTMGL1_003")# Print metadata information about the image
print("Image information:", image.getInfo())``````````````````````````````````````````````````````````
If the setup is successful, you will see details of theUSGS/SRTMGL1_003image printed in the output.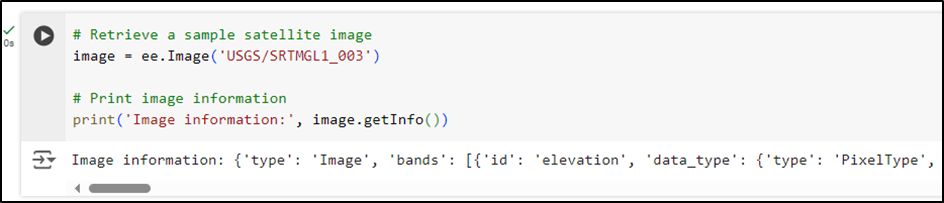
Troubleshooting Common Issues
1. Permission Denied (403) Error
If you encounter a 403 error, verify the following:
- Earth Engine API Activation: Ensure the Earth Engine API is enabled in your Google Cloud Project.
- Service Account Roles: Confirm that your service account has the required roles:
- Owner
- Service Account User
- Earth Engine Resource Viewer
- Service Account Registration: Check if the service account is registered with Earth Engine.
- Propagation Time: Allow 5–10 minutes after making changes for them to take effect.
2. Authentication Error
If authentication fails, try these steps:
- Correct Google Account: Ensure you are signed in with the correct Google account.
- Approval Confirmation: Verify that you have received the Earth Engine approval email.
- Service Account Verification: Check if the service account registration process is complete.
3. Project ID Error
If you experience a project ID error, follow these guidelines:
- Double-Check Project ID: Verify your project ID in the Google Cloud Console. Remember, the project ID is different from the project name.
- Copy Accuracy: Ensure you are copying the exact project ID.
- Allow Propagation: Wait a few minutes after creating the project before using it in Earth Engine.
Next Steps
Once your setup is successful, you can:
- Start utilizing Earth Engine data for your projects.
- Explore datasets in the Earth Engine Data Catalog.
- Learn from tutorials in the Google Earth Engine Documentation.
Important Reminder: Keep your authentication credentials secure and avoid sharing them publicly.
2.2 Adding Shapefiles as GeoJSON for Earth Engine
Purpose:
Shapefiles define areas of interest and are foundational for various geospatial tasks, such as downloading WaPOR data, clipping datasets, performing groundwater analysis, and creating development dashboards.
For best practice, shapefiles must first be converted to GeoJSON and uploaded as Earth Engine assets to be used in Google Earth Engine.
Reasons for Adding GeoJSON Assets to GEE :
-
Provides a central repository for AOI (Area of Interest) boundaries, enabling automated clipping of WaPOR data.
-
Supports integration into advanced workflows, such as groundwater modeling or dashboard development.
-
Simplifies spatial operations by leveraging GEE’s geospatial analysis capabilities.
By incorporating these steps into your workflow, you can efficiently manage spatial boundaries and automate geospatial processes for WaPOR datasets.

Python Script: Shapefile to JSON for Earth Engine Asset Upload
2.3 Accessing and Downloading WaPOR L1 and 3 Data
There are two primary methods for accessing and downloading WaPOR L3 data:
- Using the wapordl package to manually download WaPOR data, preprocess it, and upload it to GEE Assets.
- Leveraging the WaPOR v3 Automated Geospatial Data Pipeline, a Python-based solution that automates the entire workflow from data retrieval to GEE integration.
Below, we provide an explanation of both methods, including their features, workflows, and a comparison to help you determine the best approach for your project.
Method 1: wapordl Package
The wapordl package allows users to download WaPOR data directly to their local system or Google Cloud Drive. This method requires users to define the area of interest (via GeoJSON files or bounding box coordinates), specify the desired variables, and set the time period for the data. After downloading, users need to manually preprocess the data and upload it to GEE for further analysis.
Key Features of the wapordl Method:
- Flexible Downloading:
- Supports fetching WaPOR variables such as AETI, NPP, PCP, RET, and more.
- Allows defining areas of interest and selecting temporal resolutions (daily, dekadal, monthly, annual).
- Manual Preprocessing:
- Requires georeferencing and preparing data before uploading to GEE.
- Great for Small-Scale Projects:
- Ideal for users who want direct control over individual processing steps.
- Additional Steps for GEE Integration:
- Files must be uploaded to GEE assets manually after preprocessing.
Python Script: wapordl-Method
Method 2: WaPOR v3 Automated Geospatial Data Pipeline
The WaPOR v3 Automated Geospatial Data Pipeline streamlines the entire process of downloading, processing, and integrating WaPOR data into GEE assets. This Python script directly fetches data from FAO's WaPOR-Google Cloud Storage (L1 and 3 dataset), processes it with consistent projections, and uploads it to GEE assets without requiring any manual intervention.
Key Features of the Automated Pipeline:
- Automated Workflow:
- Fetches GeoTIFFs from FAO’s cloud storage and processes them into GEE assets automatically.
- Ensures consistency in projections (e.g., UTM zone) and georeferencing.
- Direct Integration with GEE:
- Eliminates the need to manually upload files to GEE, creating image collections automatically.
- Scalable and Efficient:
- Handles large datasets and long time series efficiently, processing data in daily, dekadal, monthly, and annual intervals.
- Error Handling:
- Includes retry mechanisms and monitoring to ensure smooth execution.
Python Script_level 3: WaPOR L3-AETI and E Raster Extraction, Clipping and Export via GEE
Python Script_Level 1: WaPOR L1-PCP Raster Data Extraction, Clipping and Export via GEE